Saturday, November 14, 2020

The Curious Case of Sitecore's Enforce Version Presence Permission Denied - The Fix

Standard

In a previous post, I shared a baffling enforce version presence & language fallback issue, that lead my team down a rabbit hole until we discovered that it was indeed a critical Sitecore.Kernel bug that impacted all versions, including the recent 10.0 version.

Since then, the Sitecore product team has provided a fix for this issue, which will be part of the upcoming 10.1 release.  

Until then, you can open a support ticket and reference bug #416301 and request help with your specific Sitecore version if you run into this problem.


How was it fixed?

As previously mentioned, the piece of code responsible for the permission denied error was within the GetAncestorAccess within the Sitecore.Security.AccessControl.ItemAuthorizationHelper class which is part of the Sitecore.Kernel. 

Within this method, regardless of the value that was being returned for the security checks, the key/value combo was stored in AccessResultCache and resulted in the permission denied error being thrown the next time the item was requested for a different language.

To correct this problem, a EnforceVersionPresenceDisabler "using statement wrapper" was added within the GetAccess method that is responsible for returning the "access allowed for an operation on an item".  See line 26 below. 

The switcher disables the Enforce Version Presence functionality, more specifically, it bypasses the functionality that enforces the relevant translated language version of the item to be be available for it to be returned from the API.

This was the key in corrected the access issue related to the extranet\anonymous user, and enforce version presence logic.

Saturday, October 31, 2020

Control Tracking JavaScript Using Sitecore Rule-based Configuration

Standard

Background

Being able to control tracking JavaScript via Environment and Server role is a common problem that Sitecore developers are faced with. For example, your client doesn't want their Production Google Tag Manager or agency delivered tracking pixel scripts firing on any server / app instance other than their Production Content Delivery as it will spoil analytics.

Most of the time, developers will add some type of "if statement" code in Layouts or Renderings to help facilitate this, but this could be difficult to control and maintain based on the number of scripts you end up adding to you site(s). 

In addition, if you are using SXA and HTML snippets in your metadata partial design to house the scripts, this becomes even harder.

Post-Processing HTML

I wanted to focus on finding the sweet spot in Sitecore where I could inspect the entire HTML output after it had been glued together by the various pipelines, and then remove the target script from the HTML before it was transmitted to the browser.

Sitecore's httpRequestProcessed pipeline gives is the entry point, where we can leverage the MVC framework's result filter to manipulate the HTML.

I told my content authors to add a new attribute called "data-xp-off" to their scripts that I would use as the flag to determine if the script would be removed from the page.

For example:
<script data-xp-off>some tracking stuff</script>


Writing the Code

The first step was to create a new HttpRequest processer and associated configuration to inject into the httpRequestProcessed pipeline. Within this, I was able to access the HttpContext response filter object where I could perform the targeted script removal.

As you can see by the config, you can use whatever rule-based role config to apply the processor.

Next, I created a class based on the System.IO Stream class, where I overrode the Flush method. Within this new Flush method, I removed the script using a regular expression (based on the existence of the data-xp-off attribute within the html), and then wrote it to the response.

You will notice that I also included the "noscript" and "style" tags as an option for the filtering which was a bonus.

So you may ask me; "Martin, why did you not use the powers of the Html Agility Pack to perform your HTML manipulation?".  To be honest, that was my first approach. I wrote this code:

I discovered that the InnerHtml returned by the Agility Pack was making unintentional changes to my HTML markup, and that caused problems with client-side heavy components.  Digging into Sitecore's code, I discovered that they used the regular expression approach when injecting their Experience Editor "chrome" elements, and so I went down that path too.


Saturday, October 17, 2020

The Curious Case of Sitecore's Enforce Version Presence Permission Denied

Standard

Background

I ran into a perplexing enforce version presence & language fallback issue that I wanted to share so that others won't have to go down the same rabbit hole as I did to uncover the underlying issue.

Language, Fallback and Version Presence Config

Our site is configured for almost 3 dozen languages, and as you can image, we rely on language fallback a lot!  

Language fallback works by displaying a fallback version of a language item when there is no version available in the current language context. 

So if you got to https://www.mysite.com/de-de/mypage and there isn't a German version available for that page, it will instead render the English version (if one exists) at the url.

Now, let's say that you don't have an English version for that particular page either. So, there is only a Dutch version of the page available at https://www.mysite.com/nl-nl/mypage. Then you go to the German url https://www.mysite.com/de-de/mypage. Since there isn't any fallback English version available, you would expect to see a 404 response right?

To set this up, the item would need to have both "Enable Item Fallback", and "Enforce Version Presence" enabled at its item level. The recommended way to do this is by setting these values on the template Standard Values.


Finally, you would need to set fallback and version presence on your site configuration. If you are using SXA, you would enable so this under the /sitecore/content/TenantFolder/TenantName/SiteName/Settings/Site Grouping/SiteName item.

In "Other Properties", you set "enforceVersionPresence" set to true:

Problematic Results

Initially, this seemed to work as expected. 

Referencing the example again: We only had a single language version of the item, and nothing else (not even the English fallback). The Dutch version of the page was available at https://www.mysite.com/nl-nl/mypage and then accessing any other language url https://www.mysite.com/de-de/mypage or https://www.mysite.com/en/mypage we would see the expected 404.

Over time we discovered "Permission to the requested document was denied" issues started bubbling up all over the place for our items that were supposed to fallback. Initially, this seemed to be random: different users would access the same url, and some would experience the permission denied message, while the fallback and content would be resolved without issue for others.

Investigation

This was very tricky reproduce in a scaled environment.  In our investigation, we discovered the following scenario:

1. Create any page in a non-english version only.
2. Save and publish the page.
3. Access the page url in any other language version that does not exist for that item. 
    3.1 404 for that item is returned.
4. On the same server, try and access the page url in a different language version that does not exist for that item. 
    4.1. "Permission to the requested document was denied" is returned.
5. Clearing the AccessResult cache and first accessing the item in number 4 above that didn't previously work, would make it work. Trying to access the item in number 3 above that worked previously would then throw the permission denied error.

Perplexing right?

Let me provide a more specific example:

  • A Dutch version of the page was available at https://www.mysite.com/nl-nl/mypage 
  • Accessed the page via the German url https://www.mysite.com/de-de/mypage
    • The expected 404 for the item is returned.
  • On the same server, access the English page url via  https://www.mysite.com/en/mypage
    • "Permission to the requested document was denied" is returned.

Root Cause

The support team confirmed this critical bug in the Sitecore.Kernel that is present in all recent Sitecore versions.

The piece of code responsible for the permission denied error as:


Regardless of the value that is returned for the checks, the key/value combo is stored in AccessResultCache.

Next time the item is requested it is served from this cache, the permission denied error is thrown.

Fix Forthcoming

Due to the critically of this bug, the product team is working on the fix. Once ready, and it has gone through our own QA cycles, I intend to post an update with more information about it.

Monday, September 7, 2020

Sitecore Azure PaaS - Fixing "No owin.Environment item was found in the context" When Application Initialization Configured

Standard

Background

On Azure PaaS, it is well known that Application Initialization can assist in “warming up” your Sitecore application when scaling up or swapping slots, so that your App Services instances aren't thrown into rotation to receive traffic when they aren't ready. 

Unfortunately, since Sitecore 9.1, there is a nasty Owin error that prevents this from working correctly and this in turn impacts the healthy signaling of your App Services. 

Strangely, the error would disappear after about 2 minutes.


Sitecore Support Response

After talking with Sitecore Support engineers, they ended up telling us that using <applicationInitialization> had not been tested for Sitecore, and that they don't have any official guidelines on configuring Azure App Initialization.

Finally, they said that they were not able to provide us with any assistance.

Cause

I started deciphering the problem on my own. 

Looking at this error, the key to understand its root was on line 6: the BeginDiagnostics processor.

1:  [InvalidOperationException: No owin.Environment item was found in the context.]  
2:    System.Web.HttpContextExtensions.GetOwinContext(HttpContext context) +100  
3:    Sitecore.Owin.Authentication.Publishing.PreviewManager.get_User() +15  
4:    Sitecore.Owin.Authentication.Publishing.PreviewManager.GetShellUser() +23  
5:    Sitecore.Pipelines.HttpRequest.BeginDiagnostics.ResolveUser() +41  
6:    Sitecore.Pipelines.HttpRequest.BeginDiagnostics.Process(HttpRequestArgs args) +43  
7:    (Object , Object ) +15  

The BeginDiagnostics processor in the httpRequestBegin pipeline is used for Sitecore's diagnostic tools. This determines what happens if you try to run in Debug Mode in the page editor.

In this case, the PreviewManager User property was trying to return the HttpContext.Current.User which was not available yet, and was returning null and the error “No owin. Environment item was found in the context.” was thrown.

The Fix

After determining what was causing this error, the fix was simple. The processor isn't needed on Content Delivery instances as Debug Mode is only used on the Content Management instances.

Removing the processor via a simple patch fixed the error:

Monday, August 31, 2020

Sitecore xDB - Extending xConnect To Reduce xDB Index Sizes And Rebuild Times

Standard

Background

In my previous post, I write about how you can extend the xConnect Data Adapter Provider to prevent unwanted data from being written to your shard databases.

But, what if you already have a lot of analytics and contact data in your shards, have an xDB index issue, and are struggling to rebuild your index?  

Or, what if you want to keep the data in your databases just in case you may need it some time in the future but want to lighten the load on your xDB index to improve performance?

In this post, I will show you how to filter data from your xDB index to reduce the index size and growth rate. This will also improve your rebuild times tremendously.

You can also skip ahead and check out the full source code for my example on my GitHub repo: https://github.com/martinrayenglish/Test.SCExtensions


Business Scenario

In a 9.1 project, I was faced with a very slow rebuild times, where it was literally taking weeks to rebuild our xDB index. I was very concerned with the amount of data we were ingesting into the xDB index from the shard databases, specifically the rate at which interactions where being added. I have an older post this talks about this topic, so give it a read if you have not already.

Prior to 9.2, there is no true supported way to purge old interaction data, and so I was faced with the question of how I could reduce the amount of interaction data that our xDB index contained, and preventing our business from being paralyzed for weeks waiting for a rebuild to complete in the future.

Solving The Problem

As sheer quantity of interactions was the problem, I wanted to be able to filter both new and existing interactions from being brought in from the shard databases during a rebuild or after the session end data aggregation process.

Round 1

In my initial exploration, I focused on customizing the index writer code as that seemed to be the sweet spot.  The code below shows an example of where I customized it to remove ALL interactions from making their way to the xDB index (see line 28 where I simply new up a new blank list of InteractionDataRecord objects):

To apply the updated writer, I put the new assembly into
{xconnect}\bin
and
{xconnect}\App_data\jobs\continuous\IndexWorker

 and then updated the XML files to use new writer in {xconnect}\App_data\jobs\continuous\IndexWorker\App_data\Config\Sitecore\SearchIndexer\sc.Xdb.Collection.IndexWriter.Solr.xml
and
{xconnect}\App_data\config\sitecore\SearchIndexer\sc.Xdb.Collection.IndexWriter.Solr.xml

 <IIndexWriter>  
         <Type>Test.SCExtensions.Xdb.Collection.Search.Solr, Test.SCExtensions</Type>  
         <As>Sitecore.Xdb.Collection.Indexing.IIndexWriter, Sitecore.Xdb.Collection</As>  
         <LifeTime>Singleton</LifeTime>  
  </IIndexWriter>  

This worked well for new interactions coming in from the shard databases after session end, but did not work for rebuild operations so I needed to explore further.

Round 2

The problem that I discovered after my initial try, was that the SolrWriter type specified above is not used by the rebuilder because of the dependency injection implementation details. so writing the custom implementation of the rebuilder class was not a valid option.

I started looking into other options to override the related logic.

After investigating further, I discovered that a custom implementation of both the IndexRebuilderFilter and IndexWriterFilter would take care of both new interactions from sessions and existing interactions coming in via a rebuild operation.  

I created 2 new classes to perform these tasks that I used to decorate the related interface. 

Again, in these examples, I am removing ALL interactions from my xDB index. In a real world scenario, it would be best to filter based on analytics data that is valuable to your business so that it will be available via the xDB search API. 

I show you how to do this further down in my post: More Bang - Selective xDB Index Filtering.

Next, I created decorator XML configs to allow xConnect to use my new writer extension code.

Rebuilder writer config location: {xconnect}\App_Data\jobs\continuous\IndexWorker\App_data\config\sitecore\SearchIndexer\sc.Xdb.Collection.Indexing.IndexRebuilderFilterDecorator.xml

 <?xml version="1.0" encoding="utf-8"?>  
 <Settings>  
   <Sitecore>  
     <XConnect>  
       <SearchIndexer>  
         <Services>  
           <IIndexRebuilderFilterDecorator>  
             <Type>Sitecore.XConnect.Configuration.ServiceDecorator`2[[Sitecore.Xdb.Collection.Indexing.IIndexRebuilder, Sitecore.Xdb.Collection], [Test.SCExtensions.Xdb.Collection.Search.Solr.IndexRebuilderFilterDecorator, Test.SCExtensions]], Sitecore.XConnect.Configuration</Type>  
             <LifeTime>Singleton</LifeTime>  
           </IIndexRebuilderFilterDecorator>  
         </Services>  
       </SearchIndexer>  
     </XConnect>  
   </Sitecore>  
 </Settings>  
Writer config location: {xconnect}\App_Data\jobs\continuous\IndexWorker\App_data\config\sitecore\SearchIndexer\sc.Xdb.Collection.Indexing.IndexWriterFilterDecorator.xml
 <?xml version="1.0" encoding="utf-8"?>  
 <Settings>  
   <Sitecore>  
     <XConnect>  
       <SearchIndexer>  
         <Services>  
           <IIndexWriterFilterDecorator>  
             <Type>Sitecore.XConnect.Configuration.ServiceDecorator`2[[Sitecore.Xdb.Collection.Indexing.IIndexWriter, Sitecore.Xdb.Collection], [Test.SCExtensions.Xdb.Collection.Search.Solr.IndexWriterFilterDecorator, Test.SCExtensions]], Sitecore.XConnect.Configuration</Type>  
             <LifeTime>Singleton</LifeTime>  
           </IIndexWriterFilterDecorator>  
         </Services>  
       </SearchIndexer>  
     </XConnect>  
   </Sitecore>  
 </Settings>  

After applying these updates, I was able to successful filter interactions coming from the shard databases to my xDB index during both rebuilds and session ends!

More Bang - Selective xDB Index Filtering

As you don't necessarily want to remove all interactions from the xDB index unless you are in dire straights, I added a new class for filtering interactions based on specific events. In other words, if an interaction has an event in it that we care about, we allow it to go into the index.


By using this example, you can lighten your index, and still include interactions that are important to you for personalization etc. 

This full source code for this example can be found on my GitHub repo: https://github.com/martinrayenglish/Test.SCExtensions

Monday, June 22, 2020

Sitecore xDB - Extending xConnect To Reduce xDB Growth

Standard

Background

As I mentioned in a previous post,  putting a Sitecore environment into Production with xDB enabled means opening up the flood gates for a massive amount of data flowing into the platform as it starts collecting interactions and events for both anonymous and identified contacts.

xDB Storage Smarts

Just because you can store everything in xDB, it doesn't necessary mean that you should store everything. 

xDB is a marketing database. As a rule of thumb, you should only store data in xDB if it's required for:
  • Personalization
  • Targeting
  • Measurement / Analytics

It is important to plan for the data requirements early, and again, only store the data that you really need to!

Remove xDB Analytics Data

In version 9.2 and later, xConnect allows you to delete contacts and all associated data in xDB if you choose to. So, you have the ability to remove the data that isn't useful to you anymore. https://doc.sitecore.com/developers/93/sitecore-experience-platform/en/deleting-contacts-and-interactions-from-the-xdb.html

But, you need to do this by writing code, and so you would need to work with your Sitecore architect and developers to carefully plan this out for your implementation. And again, this is only an option for the newer versions of the platform.

Extend xConnect To Filter xDB Analytics Data

One good option that I have implemented is to prevent analytics data that is not valuable to your business from getting into xDB in the first place. xConnect allows you to extend the XConnectDataAdapterProvider, and this allows you to hook into the sweet spot where the session data is being written to the shard databases for storage.


For my implementation, I extended the data adapter provider and added configuration to only goals and other events that I explicitly specify, to be recorded in my collection database.

I hope that this helps with your implementation!

Sunday, June 14, 2020

Sitecore xDB - How To Fix Right To Be Forgotten Breaking EXM Campaigns

Standard

Background

Our email manager faced an Email Experience Manager (EXM) issue where when starting or resuming an email campaign, it will start initializing and then it will go directly to a paused state.

Errors

The logs of our Content Management Server revealed the following errors: 

Cause

After digging in, I discovered that this was caused by contacts in our lists that where missing an Alias identifier. This is a dependency for EXM in the way it pulls in the necessary contact data during dispatch. 

What had happened was that our email manager had used the Anonymize feature in the Experience Profile dashboard that executes the right to be forgotten xConnect API under the covers. This process removes the Alias identifier from the contact record in our key xDB shard database tables. 


Checking the xDB Database

If you have SQL experience, you will be pleasantly surprised to find that the xDB databases are not that complicated to work with it all.

Executing the following SQL query helped me find the contacts that where missing contact identifiers:


If you compare what a normal contact looks like vs an anonymized contact, you can see that the records have been wiped from the key ContactIdentifiers and ContactIdentifiersIndex tables.

This is the SQL statement that I used:


Normal Contact


Anonymized Contact


Another important point to note is that when a contact has been anonymized, a new ConsentInformation facet as added to the contact.


The Fix

I simply wrote a SQL statement that would insert new Alias identifier records in the ContactIdentifiers and ContactIdentifiersIndex tables for the contacts in my lists that had been anonymized.


Running this SQL statement fixed the missing dependency that EXM required for its email dispatch, and our email campaigns starting sending again.


Sunday, June 7, 2020

Sitecore xDB - Solr xDB Index Troubleshooting Postman Collection

Standard

Background

Over time, I have saved a series of Solr queries that I have found to be extremely useful in understanding, troubleshooting and maintaining xDB Solr indexes.  Some are especially useful when performing an xDB index rebuild.

Getting Started

After downloading the Sitecore xDB.postman_collection.json file, you can install it in your Postman application by clicking the "Import" button located in the top-left corner of the app and selecting the file downloaded on your computer.

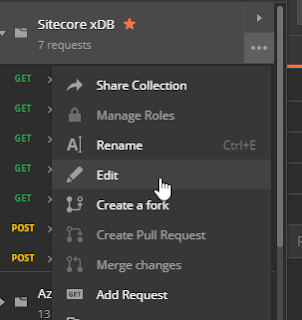
After doing this, you will see the Sitecore xDB collection appear in your Postman app:


The core / index name, and Solr url are variables, so the next thing you want to do is set the values for your configuration.

Click on the Sitecore xDB collection, and then the more actions option (3 dots) will appear. Click on Edit, and then navigate to Variables.  


Set the solr_url variable to your Solr instance url, and the xdb_index to match the index you want to work with.  

There are two xConnect Solr cores: the live core (usually xdb) and the rebuild core, which has a _rebuild suffix (like xdb_rebuild). So, you can set this to either value, depending on the core you want to work with.


That's it! You should be ready to test.

Working with the collection

The collection has the following queries available to help with your troubleshooting or maintenance.

xDB Contacts Count

This will return the number of contacts in your index (shown in the numberFound value that is returned). 

When you start an index rebuild, depending on the core you have configured, you will see this number initially be 0, and then gradually start to increase as contacts get added to the core from your shard databases. 

Obviously, this is also useful to see how many total contacts you have in your index over time.


xDB Interactions Count

This returns the number of interactions in your index (shown in numberFound value that is returned). 

xDB Docs Count

This returns the total number of documents in your xDB core. This is a combination of contacts and interactions.

xDB Sync Token

This returns the sync token which is a key component of the Sitecore xConnect / xDB optimistic concurrency model. See more information about it here: https://sitecore.stackexchange.com/questions/12453/xconnect-indexworker-error-tokens-are-incompatible-they-have-different-set-of#answer-12454

xDB Rebuild Status

As described in one of my previous posts, it will return the status of your index, which is especially useful if you are performing an index rebuild.

Default = 0
RebuildRequested = 1
Starting = 2
RebuildingExistingData = 3
RebuildingIncomingChanges = 4
Finishing = 5
Finished = 6

xDB Schema Modifications

When setting up xDB cores for the first time, you are required to make specific schema modifications to both your xDB and xDB rebuild cores using the Solr Schema API. See the Sitecore docs site for more information: https://doc.sitecore.com/developers/90/platform-administration-and-architecture/en/walkthrough--using-solrcloud-for-xconnect-search.html

This post request contains the JSON schema modifications that need to be applied to each core.  The JSON that is used in the Body of this request can be found in the schema.json file located in the \App_Data\solrcommands folder of your xConnect instance.


xDB Delete Interactions

Do not use this in your Production environment! Like the name implies, it will remove interactions from your index. This is useful for local dev environments, if you need to clean things up in your index. This can also we used as an example for working in with your Solr cores via the API.

Monday, May 18, 2020

Sitecore xDB - Troubleshooting Contacts Moving Slowly Through Marketing Automation Plans

Standard

Background

We ran into an issue on our Sitecore 9.1 Azure PaaS deployment, where contacts were moving extremely slowly through the elements of several of our Marketing Automation plans. The contacts were being enrolled correctly, but when they got to a certain step, the could be stuck for several days.

Our instance includes several high traffic sites, but our plans were not complicated at all.  For example, one was set up like this:

  • Visitor updates their profile, and after clicking submit, a goal is triggered that enrolls the contact into the plan.
  • There is a 1 minute delay.
  • An email is sent.

In this post, I will describe the approach I took to getting to the bottom of this problem.

Getting More Information From Marketing Automation Logs

This first step in any troubleshooting process is to get as much detail from your logs as possible so that you can better understand what could be going wrong. 

One of the key components of Sitecore Marketing Automation, is the task that is responsible for the processing of contacts in the Automation Plans. In Azure, this is the Marketing Automation Operations App Service (ma-ops) WebJob, or the Sitecore Marketing Automation Engine service on a Windows Server. What you need to do is set the logging level to “Information” in the sc.Serilog.xml file. 

The full path of the file location is the following (Azure):
wwwroot/App_Data/jobs/continuous/AutomationEngine/App_Data/Config/sitecore/CoreServices/sc.Serilog.xml

For more information, check the following article: https://kb.sitecore.net/articles/017744

After getting this in place, I was able to rule out the possibility of exceptions being thrown that could have been causing the problem.

Finding the clogged Automation Pool

After digging in, I discovered that the number of contacts in the UI corresponded to the data in the Marketing Automation (ma-db) database’s AutomationPool table.  

These are the other things I discovered:
  • Running a “row count” query against the AutomationPool table determined that there were 100s of millions of records.
  • Checking Azure resource analytics showed large database utilization spikes (100% DTU) that corresponded to high CPU on my ma-ops service (averaging above 70%).
  • Running a profile on the maengine.exe job revealed that getting and processing the data from the SQL server seemed to be the bottleneck.

Fixing the clogged Automation Pool

Database Health

One key assumption here was that my ma-db was healthy, and that its indexes were not seriously fragmented.

In previous posts, I have spoken about how important it is to make sure that regular maintenance is performed on your databases. Same thing applies here. Make sure that you run the AzureSQLMaintenance Stored Procedure on your ma-db regularly.

Increase Pricing Tier If Possible

The analysis determined that both my ma-ops app service and ma-db database were struggling to keep up with the processing load, and so I increased the pricing tier on both to give them more horsepower.

Increase Low Priority Worker Batch Size

The AutomationPool table showed me that almost all of the items had a priority of 80, and would be processed by the LowPriorityWorker. I opted to increase the batch size of this worker, so that it would process more items in each batch.  My worker was initially set to 200, and so I tippled it to 600.

The config file location can be found here: App_Data/jobs/continuous/AutomationEngine/App_Data/Config/sitecore/MarketingAutomation/sc.MarketingAutomation.Workers.xml

<LowPriorityWorkerOptions>
<!-- How long the worker sleeps when there is no work available -->
<Schedule>00:00:20</Schedule>
<!-- The minimum priority of work item to process. -->
<MinimumPriority>0</MinimumPriority>
<!-- The timeout period to use for work items. -->
<WorkItemTimeout>00:00:45</WorkItemTimeout>
<!-- The period after which the work item timeout is set again. -->
<WorkItemTimeoutSchedule>00:00:30</WorkItemTimeoutSchedule>
<!-- The batch size multiplier to use when checking out work items from the pool. -->
<BatchHead>4</BatchHead>
<!-- The batch size to use when checking items out from the pool. -->
<BatchSize>150</BatchSize>
</LowPriorityWorkerOptions>

Clog Removed

After making these adjustments, I kept a close eye on the number of rows in the AutomationPool table.

I am happy to report that they were decreasing at a pleasing rate, and that the data started to appear in the reports in the UI.